Translation by Alexander Ostrovsky
Excessive visualization of gingival tissue, often referred to as a “gummy smile,” has attracted increased attention from dentists in recent years and has been reflected in the dental literature. The etiology of the above condition is heterogeneous and includes the length and mobility of the lips, the length of the dental crowns, dento-alveolar protrusion, and the height of the maxilla. In this regard, it is necessary to carry out a differential diagnosis in order to prescribe adequate therapy in each specific case. The purpose of this article is to describe the differential diagnosis of excessive visualization of gingival tissue and recommendations for correcting this condition.
Articles addressing excessive maxillary gingival visualization (often referred to as the “gummy smile”) have become increasingly common in the dental press in recent years.[1-7] This increased attention to this problem is based on a professional desire to meet the esthetic and functional needs of the patient. Tjan et al. report that approximately 7% of men and 14% of women have excessive gingival display when smiling.[8] Gingival overexposure is a descriptive term rather than a diagnosis that requires specific treatment. Since this condition is polyetiological, a combination of several factors is common for it. Thus, a differential diagnosis is necessary. This article describes the differential diagnosis of excessive gingival visualization, as well as recommendations for its correction.
Diagnosis
To make a correct diagnosis, the doctor needs knowledge in the field of facial aesthetics. The main evaluation parameter is the height of the facial oval. When the facial muscles are relaxed, the height of the middle part of the face should be equal to the height of the lower part (Fig. 1).[9] The anatomical landmarks of the midsection are the glabella, the most prominent point of the frontal bone between the brow ridges, and the inferior point of the nasal septum. The lower part is measured from the lowest point of the nasal septum to the lowest point of the soft tissues of the lower jaw, i.e. lower edge of the chin.
Figure 1. The height of the middle third of the face, measured from the bridge of the nose to the lower edge of the nasal septum, should be equal to the height of the lower third of the face, measured from the lower edge of the nasal septum to the lower edge of the chin.
After assessing facial height, it is necessary to determine the length of the upper lip. When measured in a relaxed state of the facial muscles from the lower point of the nasal septum to the lower edge of the lip, the average length of the upper lip in young women and men is 20-22 mm and 22-24 mm, respectively.[10] In a calm state of the facial muscles in young women, 3-4 mm of the central incisors of the upper jaw are usually visualized (Fig. 2), the same figure in men of the same age is 2 mm less.[11] With age, there is a tendency for the upper lip to lengthen. Therefore, the upper incisors are visualized less, and the lower incisors become more “open” in a calm state of the facial muscles. When the patient smiles broadly, the upper lip should move towards the dentogingival junction of the maxillary central and lateral incisors (Fig. 3). When more than 1.5-2 mm of gum is exposed, an unfavorable aesthetic effect occurs.
With a wide smile, the cutting edge of the upper jaw teeth should run parallel to the curve of the lower lip and lightly touch it (but not be covered by it) (Fig. 3). When the cutting edge does not come into contact with the lower lip when smiling, the result is a negative aesthetic effect. Lastly, when conducting a clinical analysis, the length of the crowns of the central incisors of the upper jaw is assessed, which is usually 10-11 mm.[12] Using the data obtained, it is possible to determine the cause of excessive visualization of the gums in each individual patient.
Dental clinic No. 2
The anterior teeth of the upper jaw are characterized by both functional and aesthetic parameters.
By their nature, these are the teeth that are visible both when talking and when smiling. That is why there are such a significant number of approaches trying to imitate as much as possible all the subtleties of the anatomy of the teeth of the upper jaw. Considering that in addition to shape, the technician must also understand the characteristics of color, texture, rotation and spatial position of the teeth, it is quite easy for him to get lost in all these details. That is why in this article we will focus not on individual modeling elements, but on a systematic approach to restoring the morphology and structure of the frontal group of teeth.
After completing the modeling of the basic shape, the technician can begin to restore the individual characteristics of the tooth, following the proposed protocol, thereby saving a huge amount of time.
The described approach is unique in both modeling all six anterior units and restoring the shape of a single tooth, regardless of whether the technician is working with wax or final structures, in conventional or digital mode. After all, the most important thing lies in the details, which are emphasized after modeling the basic form of future restorations.
Step by step protocol
1. When restoring several anterior teeth, modeling should always begin from the middle of the row, namely from the labial cutting edge of the central incisors. The middle of the restoration is determined by the median anatomical landmarks of the face: along the line connecting the bridge of the nose, the apex of the nose and the center of the chin. The second interpupillary line (photo 1) is modeled perpendicular to the midline of the face: the cutting edges of the incisors on the labial side should be parallel to the interpupillary line.
Photo 1. Facial landmarks and transfer of the interpupillary line to the horizontal plane of the central incisors.
2. After this, contact points are modeled: the position of those from the incisors to the canines shifts more and more towards the cervical area, as shown in the photo with a red line (photo 2 - 3).
Photo 2. The area of contact points shifts more cervically from the incisors to the canines.
Photo 3. The area of contact points moves more cervically from the incisors to the canines (red lines).
3. At the next stage, the lingual surfaces are modeled. Since all teeth take part in the act of chewing, it is therefore simply impossible to model their lingual surface without taking into account the interaction with antagonist teeth. The cutting edge of the teeth, in essence, is their cutting ridge; in the photo, the line of the cutting edge on the labial side is shown in red, and on the lingual side - blue (photos 4 - 5). These edges are the boundaries of the cutting ridge. We should not forget that the lingual edge of this ridge is not only an aesthetic, but also a functional component that interacts with the lower incisors during chewing, while the labial edge of the upper teeth is visualized when the patient smiles and talks. The labial margin of the restoration can be lengthened or repositioned as long as it does not compromise the function, esthetics and phonetics of the teeth being modeled. The cutting edges are rarely symmetrical and parallel (photos 4 - 5). Simply put, the function of the lingual side of the incisors is derived from their labial contour.
Figure 4. The incisal ridge consists of a labial edge (red line) and a lingual edge (blue line).
Figure 5. The incisal ridge consists of a labial edge (red line) and a lingual edge (blue line).
4. The mesial angle line, which is represented in the photo by a black line, is the next element for modeling (photo 6). If you look at the teeth from the front side, they can be divided into segments vertically (photo 3): the central one can be divided into three parts, the lateral incisors and canines into two. The line of the mesial angle of the central incisor begins near its contact point and ends in the cervical part of the tooth in the region of the mesial third of its lateral side. The line of this angle should correspond as much as possible to the line of the adjacent central incisor. A similar lateral landmark for the lateral incisor begins at or above the contact point and ends in the cervical region near the middle of the tooth side. The line of the mesial angle of the canines also begins above the contact point and moves towards the middle of the tooth.
Photo 6. Mesial angle line (black line).
5. After this, they begin to model the lines of the distal angles (photo 7), again moving from the area of the central incisors to the canines. These landmarks should coincide as much as possible between the teeth on the right and left sides. Of course, the width of a symmetrical tooth may differ, but they can be optically modified to ensure that the lines of the distal angles coincide as much as possible.
Photo 7. The distal angle line moves from the incisors to the canines.
6. The height of the cervical contour, drawn with a white line (photos 8 - 9), should follow the contour of the soft tissues (pink) as much as possible. Therefore, when modeling this parameter, it is necessary to use a duplicate of the soft tissue position. The apex of the cemento-enamel junction of the central incisor is located in the area of the distal third, and the lateral incisor and canine are in the area of the middle of the tooth (photo 6).
Photo 8. The height of the cervical contour (white line) follows the contour of the soft tissues.
Photo 9. The height of the cervical contour (white line) follows the contour of the soft tissues.
7. The last step in modeling is to adjust the labial component of the incisal edge. The shape of this formation (photo 10) can vary greatly, since it does not interact with the cutting edges of the lower incisors during chewing.
Photo 10. Shape of the labial edge.
Typically, the labial edges of the central incisors and canines follow a horizontal line, but during modeling the author uses a Kois Waxing Guide (Panadent) (Figure 11) to ensure that the incisors and canines are exactly in the same horizontal plane.
Photo 11: Kois Waxing Guide is used to check the horizontal plane of the incisors and canines.
If you outline the main forms of modeling without teeth, then everything becomes simple and clear (photo 12). It is important to correctly fill in these lines during restoration and connect the corresponding points correctly. After rough modeling, the technician begins to restore individual parameters. With the vestibular view of the teeth, the distal side of the canines disappears from the field of view or is very faintly traced (photo 13), so the visual shape of the dental arch can be expanded due to better visualization of the distal side of the third teeth.
Photo 12. View of the base lines without teeth.
Photo 13. In the vestibular view, the distal part of the canines is faintly visible.
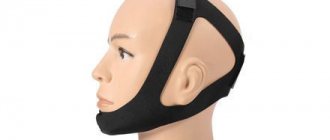
Short or overactive upper lip
If a patient with excessive visualization of the maxillary gums has a short upper lip (compared to the norm) (Fig. 4 and 5), then this is most likely the cause of aesthetic imbalances. If the length of the facial contour, gums, lips and central incisors is normal, then in a patient with excessive visualization of gingival tissue, the likely cause of this condition will be an overactive upper lip. In young women, with a calm state of the facial muscles, 3-4 mm of the central incisors of the upper jaw are usually visualized, and with a wide smile, the crown of the teeth 10-11 mm long is completely visible. Accordingly, the upper lip should usually rise 6-8 mm during the transition from a relaxed state of the facial muscles to a wide smile. However, in a patient with a hyperactive upper lip, these parameters may be 1.5-2 times higher. At the moment, there are no methods for dental correction of a short or overactive upper lip, however, plastic surgery is possible. However, it is important to make this diagnosis when planning restorative treatment of anterior teeth. The patient should be informed that treatment may not only fail to correct, but may even worsen excessive gingival visualization.
Types of wax modeling
The most important part of prosthetic practice in dentistry is diagnostic wax-up. Its essence lies in the fact that the dentist and dental technician create a model of future work from wax. Wax is the most effective material for this purpose, since it is incredibly plastic and, when hardened, quickly takes the desired shape. Thanks to this, the technician manages to create the desired form, like a sculpture - his own artistic creation. Such wax modeling must be practiced before all types of work in a dental laboratory in order to work out all its details in advance.
The main practice of any orthopedic dentist involves the use of functional wax modeling. When preparing for orthopedic treatment, it is necessary to model not only the general shape of the teeth, but also the position of each individual tooth. The finished prosthesis or crown should be strong and comfortable for the patient, and the temporomandibular joint should not be under tension.
Groups of teeth and their functions
It should be noted that each group of teeth and individual teeth perform different functions, and this is important to consider when working with an orthopedist and technician. It is customary to distinguish the following functional areas of the dentition:
- Anterior group of teeth. This includes the incisors on both jaws. For them, the main function is the guiding function when moving the lower jaw forward. In addition, this group of teeth is important for recognizing food and determining the force of chewing, and also affects a person’s speech and the position of his lips. It should also be remembered that the incisors determine the aesthetics of the face and the entire dental system.
- A lateral group of teeth that includes the molars (6th, 7th and 8th teeth). Their main function is related to chewing and supporting properties.
- Premolars (4th and 5th teeth). They are involved in chewing and lateral movements.
- Fangs. These teeth perform the most important function of “all-round protection” of the teeth. When the lower jaw moves forward, as well as during lateral movements, all teeth become separated. Thanks to the fangs, the dental system is normalized and returns to its normal position.
The success of any treatment depends on many factors that the dentist must consider. The dental system of each person is completely unique and is influenced even by such features as the nutritional system or character traits.
Types of wax modeling
The following types of wax modeling are used in dentistry today:
- Modeling for planning the upcoming restoration: in case of severely damaged teeth, creating an accurate model helps to determine the volume of required preparation of dental tissues and agree with the technician on the creation of a future restoration (if we are talking about a ceramic filling, veneer or crown).
- Modeling for the creation of prosthetic structures, including in order to agree with the patient on the type of dentition after orthopedic treatment.
- Diagnostic modeling to determine the condition of the bite and options for its correction. Wax models are also made during the process of correcting the bite to accurately assess its condition and changes occurring.
- Modeling for planning the placement of implants or combined removable-fixed prostheses.
In recent years, with the development of technology, new electronic diagnostic devices have appeared. The accuracy of measurement increases, which means treatment becomes more effective. A modern device for wax modeling is called an articulator. It is programmed individually for each patient, for which the necessary parameters are measured. These measurements are carried out using condylography during preparation for treatment.
It remains to add that in order to conduct wax modeling, both the orthopedic dentist and the dental laboratory specialist must have the highest qualifications.
The result of this joint work is the patient’s individual occlusion project. It is carried out by installing temporary crowns, which are fixed by an orthopedist, taking into account the preservation of functionality and aesthetic properties.
If you have a problem similar to that described in this article, be sure to contact our specialists. Don't diagnose yourself!
Why you should call us now:
- We will answer all your questions in 3 minutes
- Free consultation
- The average work experience of doctors is 12 years
- Convenient location of clinics
Single contact phone number: +7
Make an appointment
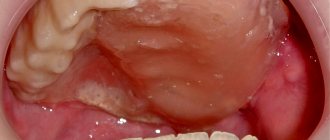
Change in passive protrusion
The presence of short maxillary central incisors (less than 9 mm) can result from several factors (eg, normal variation, wear of the incisal edge, excess gingival coverage). Although cases of insufficient height of the central incisors do occur, it is quite rare. A more common cause is abrasion of the cutting edge. To determine the degree of tooth wear, it is necessary to measure the distance between the cemento-enamel junction (CEJ) and the cutting edge of the incisor, which is normally 10-11 mm for central incisors. Thus, the degree of abrasion of the incisors is determined relative to the average value of this indicator. Another method is wax modeling of a worn incisor on a diagnostic model using wax, when the ideal contour of the incisors is restored, after which the height of the added wax is measured.
The reason for the decrease in the clinical height of the crown may also be its excessive gum coverage. Since the most common etiology of this condition is gingival hyperplasia, the gum itself and its contours rarely look normal. When the gums appear healthy and the reduction in crown length of the central incisors cannot be explained by wear of the incisor edge alone, it is most likely due to alteration of passive protrusion.[4] During the normal process of teething, the central incisors of the upper jaw pass through the gum and continue to actively grow until they come into contact with the opposing teeth. At the eruption stage, a significant part of the anatomical crown remains covered by the gum. With age, the anatomical crown becomes increasingly visible due to apical migration of the gums. This process, called passive protrusion, continues during adolescence until the gingival margin is located 1-2 mm from the CEJ. For reasons still unknown, in some patients the process of normal passive protrusion stops. This results in the formation of a short clinical crown due to excess gingival coverage. This condition is called “alteration of passive protrusion” or “delay of passive protrusion” (Fig. 6 to 9).[13] Although, according to Volchansky and Cleaton-Jones, the level of the gingival margin of the maxillary central incisors is relatively stabilized by 12 years of age,14 it would be premature to make a diagnosis of alteration of passive protrusion until the patient has completed growth. To diagnose alteration of passive protrusion, the tip of the instrument is inserted under the gingival margin to determine the CEJ. If it is possible to determine the level of the CEJ, then a decrease in crown height can be considered a variant of the norm, erasure of the incisor edge, or a combination of both. If the CEJ cannot be determined, it is most likely hidden by adjacent tissues and then the diagnosis of alteration of protrusion is obvious.
Rice. from 6 to 9 Since the treatment of alteration of passive protrusion includes surgical lengthening of the coronal part of the tooth,[1,4,15] it is necessary to conduct additional diagnostic studies to carry out adequate intervention. Under local anesthesia, the position of the alveolar ridge is determined. A periodontal probe is placed in the sulcus and advanced until it contacts the alveolar ridge. The distance from the gingival margin to the bone crest is approximately 3 mm,[16,17] and is called the “biological width” (BW) (Fig. 10).[18]
Figure 10. Biological width. Note the position of the adjacent connective tissue, epithelium, and gingival margin in relation to the alveolar bone margin.
After determining the position of the edge of the alveolar ridge, the area of the attached gum is measured. The periodontal probe is pressed against the mucosa in the projection of the corresponding tooth perpendicular to the longitudinal axis of the teeth. The probe is moved towards the crown until a fold appears in the area of the mucogingival junction (GJ). Thus, the distance from the SDS to the gum edge is determined. To determine the zone of attached gingiva, the value of the zone of free gingiva, measured from the gingival margin to the base of the pocket, is subtracted from the total value of keratinized gingiva.
After assessing the attached gingival zone and biological width, the preferred method of surgical treatment can be selected. A healthy gum requires a biological width of at least 3 mm. Thus, if a patient has a SB of 4 mm, then 1 mm can be removed with gingivectomy. Before any surgical procedure begins, the dentist must ensure that there is an adequate amount of gum remaining (3 mm) after the operation. For example, if there is 1 mm of excess gingival excision and the presence of normal bone and gingival parameters, the soft tissue gradually regenerates until a distance of 3 mm is restored between the gingival margin and the edge of the alveolar bone crest.
SB with alteration of passive protrusion is often 3 mm. The gum removed during gingivoplasty or gingivectomy gradually regenerates in its original place until it reaches normal biological length. In such cases, more attention must be paid to the underlying bone. The mucoperiosteal flap is folded back to visualize the bony ridge, which is usually adjacent to or even fused with the CEJ. Since there is no biological indication for removing interproximal bone, the flap does not involve the interdental papillae. Using high-speed tips and chisels, bone tissue is removed until a distance of 2-2.5 mm is reached from the CEJ to the edge of the alveolar ridge (Fig. 11).
Rice. 11 The distal size of the flap depends on the amount of gingiva visualized with a wide smile. The size of the flap usually extends to the mesial border of the first molars. After completion of the ostectomy, the flap is adapted (slightly coronal to the CEJ) and sutured. Using a periodontal probe inserted under the flap, measure the distance from the gum edge to the edge of the alveolar ridge, which should be approximately 3 mm. After suturing, minor reconstruction of the gingival contour can be performed using electrosurgical instruments to achieve complete symmetry. When a good relationship between bone and adjacent gingiva can be achieved, healing occurs with minimal coronal or apical gingival displacement (Figures 12 to 14). However, it is often necessary to perform additional minor soft tissue reconstruction 6 weeks after surgery.
Rice. from 12 to 14
Classic modeling of crowns and bridges for metal-ceramics of the frontal and chewing group
A huge amount of materials is used in the professional work of a dental technician. The final result of its work depends on their quality and performance characteristics. Dental waxes are also important materials.
The main requirements for waxes are:
- Low shrinkage
- Good ductility
- No delamination during application and processing
- Sufficient hardness to ensure stability of the wax structure
- Ashless
For the last two decades, in my work I have been using waxes from a German manufacturer, so I will compare Denest wax with them.
We will test using the example of modeling anterior and chewing teeth for metal-ceramics. The design also provides for one-piece crowns. Collapsible models were prepared and plaster dies were made. Heat up the dipping wax in the wax furnace. We will not dwell on operating temperatures, since both wax melters and electric spatulas work differently for everyone - depending on the attachment used, the quality and age of the device. In general, it’s not difficult to adjust intuitively.
Dipping wax is yellow in color and quite transparent. The thickness of the initial structure is well controlled. When adjusted with a modeling tool, it does not crack and scrapes well. When cooled, it is quite hard and durable.
Green modeling wax
Easy to apply. At the correct temperature, the spatula has predictable fluidity; chips are easily blown off the model and do not stick to it. A little softer than the German wax I use, but I liked this one better. It polishes better with a brush. Let's evaluate this when modeling solid crowns. Also perfect for modeling intermediate parts of bridges.
Red cervical wax
It also has good fluidity and is easily applied to the cervical part of the stump. Combines well with dipping and modeling wax.
When adjusting with a modeling tool, I noticed that it was a little softer than the German one I was used to. This is not a negative, just an observation. It is better to polish with a brush. A little work was left for a day before casting the frame.
No visible shrinkage processes were detected. At one time, I had an incident with cervical wax from a respected well-known German manufacturer: the shrinkage of the cervical wax in a few hours reached almost half a millimeter, as a result of which the work did not have time to reach the foundry laboratory. Perhaps it was a defective batch.
The modeled crowns are removed from the dies easily, without any cracks or deformations. The junctions of different waxes are monolithic, without delamination.
Bonding blue wax
It is easy to apply, has the necessary fluidity, forms well, and ensures the stability of the connecting elements. Very similar to the bonding wax of the German manufacturer, only a little more transparent.
conclusions
Having worked with Denest waxes, I concluded that these waxes are of high quality and in no way inferior to their foreign analogues.
- Nice, contrasting colors where required
- Necessary transparency
- Good, predictable fluidity at correctly selected instrument temperatures
Waxes are flexible, easy to process and polish. When heated, they hold their shape.
I would like to pay special attention to the packaging in a sealed tin jar with a convenient lid. It’s more convenient than its foreign counterparts, which made their packaging out of plastic (the lids break, are accidentally burned with a spatula, and so on) or the wax itself is made in the shape of a tooth, and it’s so beautifully modeled that it’s a pity to immerse a hot spatula in such beauty.
To summarize, I will say that with a clear conscience I can recommend Denest wax as a high-quality material that is not inferior to foreign analogues. At least the waxes that I have tried from their wide range have excellent characteristics. I think the others are not inferior in quality and ease of use.
Author: Dental technician (Municipal clinic, Novosibirsk, highest category, work experience - 28 years).
Dento-alveolar extrusion
Dento-alveolar extrusion is the excessive eruption of one or more teeth in the frontal group of the upper jaw. This condition mainly occurs in cases of lack of adequate opposing occlusion and is most often observed in patients with class 2 occlusion pathology. With the growth of the incisors of the upper jaw, the corresponding section of the alveolar process moves down along with the teeth. In patients with correct aesthetic proportions, an imaginary line connecting the maxillary canine fossae should pass through the periodontal line of the maxillary central incisors. In the case of dento-alveolar extrusion, the incisors lengthen, which leads to displacement of the gums and the underlying bone. In this case, the imaginary line passing along the dentogingival junction becomes broken as it moves downward as a result of the low position of the central incisors (Fig. 15). In addition, the incisal edge of such teeth may be covered by the lower lip in a wide smile due to the low position of the upper incisors. It is the process of excessive teething of the frontal teeth that can determine in this case the excessive visualization of gingival tissue (Fig. 16).
Rice. from 15 to 17
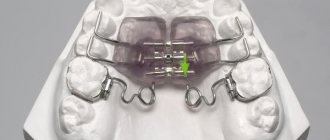
Treatment of dento-alveolar extrusion involves restoring the correct position of the teeth.[19] This can be achieved either through orthodontic treatment or surgically using a segmental osteotomy (Fig. 17). Whatever method is used, mandatory restoration of occlusion is required to achieve stable contact of the frontal teeth, which usually requires the creation of long-term retention.
Disproportionately high upper jaw
Using the above aesthetic criteria, in patients with excessive visualization of gingival tissue, clinical evaluation can be performed to determine the degree of maxillary height. If the lower part of the face is longer than the middle part, then the etiology of excessive gingival visualization may be an increase in the height of the upper jaw. As in the case of dento-alveolar protrusion, the incisal edges of the maxillary incisors may be covered by the lower lip in a wide smile due to their low position. The diagnosis can be confirmed by cephalometric radiography.
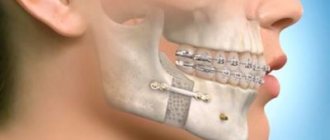
Shortening a high maxilla usually requires the use of maxillofacial (orthognathic) surgery (Figures 18 and 19).[19] A section of the upper jaw is removed and moved to a given position. In some cases, the lower jaw is independently placed into occlusion and does not require surgical intervention. However, sometimes it is necessary to perform an osteotomy of the mandible to form a stable occlusion.
Rice. 18 and 19
Combination of several etiological factors
Quite often in patients with excessive gingival visualization, this condition occurs as a result of several factors. Although this complicates treatment planning, the presence of multiple etiological factors is not a serious obstacle when using the diagnostic methods described above. For example, alteration of passive protrusion is often observed in patients with a high upper jaw. In this case, a gingivectomy is first performed to create the optimal length of the clinical crown. Diagnosis can then begin using radiography, simulation and dynamic facial assessment. This study should include determining the position of the incisal edge of the upper jaw teeth (in a calm state of the facial muscles and with a wide smile), the appearance of the frontal teeth of the upper jaw (in a calm state of the facial muscles and with a wide smile) and the position of the upper lip line with a wide smile. Once a diagnosis is made, an appropriate treatment plan can be formulated and implemented using orthodontic correction and maxillofacial (orthognathic) surgery.