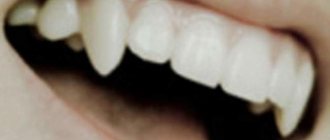
What party or Halloween can take place without the presence of a vampire. The black coat and pale look have faded into the background in modern cinema, so you can match the look in regular jeans. But what you really can’t do without is the main attribute of any vampire, his fangs.
Prices for this element of a fancy dress costume are often unreasonably high, so you should think about making them yourself. There are many different ways to make teeth or jaws like a real vampire, the five most popular materials for making them are:
- Paper;
- Plastic fork;
- Artificial nails;
- Cotton wool;
- Clay or plasticine.
Paper fangs
How to make paper teeth for a vampire or werewolf costume at home, without much expense? All you need is a piece of paper measuring 10x10cm and five minutes of free time. It is folded like origami, quickly and easily, but you should not choose a white color of paper, since the natural color of the teeth will stand out with yellowness against its background. The downside of this method is not durability; the paper jaw will crumple and become saturated with saliva in a couple of minutes. Therefore, it should only be used for a spectacular appearance, in the midst of a party.
Necessary materials:
- paper;
- scissors.
How to do:
- Prepare materials for the master class: form balls of wax plasticine in the required colors.
- On a piece of paper, draw the tooth, gums and dentin outline.
- Let's start by filling in the area of dentin (the second layer of the tooth). To do this, take a piece of pink wax plasticine and, forming an outline, smear it towards the center. You don't have to worry about going beyond the intended edges, since we'll adjust them later with the next layer.
- Now we will make the enamel of our tooth. Form flagella from white plasticine and place the tooth along the contour. Then grease it up to the pink part without going beyond it.
- Form a long flagellum from yellow plasticine and lay it along the sample - this will be the pulp of our tooth.
- Smear the plasticine: note that this layer is not as thick as the previous ones. Using the tip of a stack or a pencil lead, make notches on the layer.
- Form thin flagella from red plasticine. To do this, just roll them with folded fingers on the surface of the table.
- Lay the flagella from the roots to the top of the pulp. Make them branchy. We've got blood vessels. To be precise, there are nerves inside the tooth; the vessels consist of venous and arterial ones. But we have simplified the scheme for children. If you wish, you can also add blue and yellow flagella.
- Trace the outline of the tooth with a black felt-tip pen.
- Form the contour of the gum and bone tissue. We used pink and orange markers.
- Paint over the gums, and we painted the bone tissue as pimply.
Our tooth is ready! It’s so bright, beautiful and we now know what it looks like inside!
Fangs from a plastic fork
How to quickly grow fangs from a plastic fork at home? To do this, use scissors to cut out the two middle tines of a regular white or beige plastic fork. Next, cut off the handle to the beginning of the bend, but just above the line of the teeth. Wash the resulting form thoroughly under the tap. We attach the convex side to the upper jaw using dental wax or nail glue.
You can also cut off the two outer tines of a plastic fork and attach them with thin strips of tape.
First, each tooth must be cleaned and wiped dry. Scotch tape, unlike nail glue, is safer and will not harm the enamel.
Necessary materials:
- Plastic fork;
- Knife or scissors;
- Dental wax, nail glue or tape.
Restoration of the anatomical shape of the anterior group of teeth
The dentofacial system is the initial section of the human digestive tract. With the help of the dentition of the upper and lower jaws, food is crushed into small components, forming, when wetted with saliva, a volume of food bolus. In addition to performing this function, the teeth in the dentoalveolar system, together with the facial muscles, also take an active part in the articulation of speech sounds. All this creates a single, functional integrity of the body, where the anatomical shape of the teeth (morphology) of the upper and lower jaw is one of its important and integral parts.
The anatomical shape of the teeth in the dentition, of all parts of the human dental system, is most directly related to the functional purpose of the digestive tract. Many anatomical and spatial connections transform the dentition into an interconnected deep-spatial composition, which, in addition to the function of cutting, tearing, holding and crushing food, also carries a great aesthetic aspect. Strict mathematical proportions determine anatomical points, shape filling lines, edges, and planes in the teeth of the upper and lower jaw, the distortion of which, even to a slight extent, leads to a violation of aesthetics and functional occlusion and speech diction. If you analyze the construction of the vestibular and palatal surfaces of the frontal group of teeth, you will notice that the teeth in the dentition form a certain sequence. According to E. Levin’s description, the ratio of the sizes of the vestibular surface of the frontal teeth (central incisor to lateral incisor; lateral incisor to canine, etc.) is a proportion in the digital ratio 1: 0.618, which corresponds to the proportion of the “golden section” (from the materials of the Esthetic dentistry magazine ) . Each subsequent tooth corresponds in a certain proportion to the previous one. A slight distortion of the relationship or change in the size of just one mesial or distal facet can completely change the perception of the entire dentition
anterior group of teeth. Before starting work, a dentist or dental technician must thoroughly study the main anatomical landmarks of the dentition.
The vestibular surface of the anterior group of teeth must meet the following parameters (Fig. 1)
From the palatal surface, the construction of the anterior group of teeth looks like this (Fig. 2)
Knowledge of anatomical landmarks (form filling lines, edges and planes in the dentition) can greatly simplify the work. But it should also be noted that recreating the shape of the teeth in the dentition requires constant monitoring from all points of view. A dentist or dental technician is required to have the ability to generally perceive the volume of a tooth, a sense of the vestibular and palatal surface as a whole.
When working, for example, on a veneer of a central incisor, it is necessary to analyze the work of each stage from all planes at once. In addition to the general view of the vestibular surface, a schematic “coordinate system” (the general anatomical structure of the construction of teeth in the dentition) should always be in front of the eyes, which can significantly simplify the task of constructing the shape of a specific tooth.
Let's take a closer look at the structure of the front teeth.
CENTRAL INCISERS (teeth 11 and 21).
The upper central incisors are powerful single-rooted teeth with a crown flattened in the vestibular-palatal direction. Of all the anterior teeth of the upper and lower jaw, the central incisors are the most stable teeth in terms of reduction. The shape of the crown of the upper central incisor can take various variations, but three of the most common ones can be noted.
This is a rectangular shape, when the parallel side edges resemble the shape of a rectangle, a triangular shape, with the side edges converging towards the neck, and an oval shape, when the side edges form an approximate oval shape and the greatest width of the crown is in its middle third. The approximal surfaces of the central incisors often differ from each other in their content. The medial surface has a more rigid, vertical line that forms a straight, sometimes acute angle with the line of the cutting edge of the crown, and the distal surface has a rounded surface with a pronounced fracture line in the shape of the lateral edge and a blunt, mostly rounded distal angle
The volume of the root in relation to the central axis of the tooth is shifted in the distal direction and has three planes: vestibular, medial and distal. On the surface of the tooth root, from two apraximal surfaces, one can notice two small hollows, indicating the formation of the volume of the crown from two components of the primary principles, the volume of the “facet” of the vestibular surface and the volume of the palatal tubercle.
The line of the incisal edge of the crown usually has a beveled surface in the distal-palatal direction, with a thin line of dentin often visible. If we consider the shape of the central incisors, with a non-erased surface (in young patients), then on the surface of the cutting edge of the crown, you can see three protruding tubercles (lobes), each of which is divided on the vestibular surface by a weakly defined longitudinal hollow. From the side of the cutting edge, you can also notice an uneven filling of the volume of the crown from the medial and distal surfaces, called the mesial-distal rotation of the crown or a sign of enamel curvature. From the medial surface of the tooth, the volume of the crown seems much thicker than from the distal surface, which creates the impression of a helical turn of the crown around the root and makes it difficult, at the time of restoration, to correctly position the incisor in the dentition. The development of the medial-distal spread usually has a gradual filling from the medial to the distal edge, but sometimes it can take the form of thickening of a separate lobe, not the medial one, but, for example, the central one. Then the general ratio of volumes is violated, and the sign of the medial-distal turn will be changed.
On the vestibular surface, in addition to two vertical hollows dividing the volume of the crown into three lobes, on the upper third of the tooth crown, fracture lines of the lateral edges are formed, forming a barely noticeable drop-shaped volume on the vestibular surface of the incisor (vestibular volume). This shape on the surface of the crown of the central incisors is clearly visible from the distal side, but on all other teeth of the dentition, this shape formation is very pronounced (especially in the canines and premolars) both from the distal and medial surfaces.
The structure of the palatal surface of the crown combines the volume of the palatal tubercle and the central plane into a single form. On the medial and distal sides, the crown is limited by two lateral volumes of the medial and distal edges. The degree of development of these volumes varies from a barely noticeable form to a strongly pronounced volume. With a strong development of the lateral edges, two powerful “rollers” are formed on the palatal surface of the incisor crown, giving the shape of the incisor crown a “scoop-shaped” shape. The lateral volumes, in a similar situation, can converge at the point of the equator line, uniting the medial and distal edges and forming a “blind fossa” point on the palatal surface in the area of the upper third of the tooth crown. With a normal degree of development, the medial and distal ridges dock with the volume of the palatine tubercle, forming a smooth transition of volumes along the fracture line of the lateral edges. The shape of the palatine tubercle is a powerful volume, from which two additional tooth-like volumes extend towards the incisal edge, turning into thin, sometimes barely noticeable ridges on the central surface. On the surface of the crown there are usually two faces on the mesial and distal sides, however, various variations are possible when the number of faces changes and they differ from each other in size. If the volumes of the lateral faces on the surface of the crown of the central incisor are strongly expressed, then the shape of the central faces can be combined with the lateral faces, forming a scoop-shaped volume of the crown.
On the approximal surface, the structure of the central incisor forms a smooth transition from the vestibular surface to the palatal surface. At the moment of intersection, two mutually directing lines form the line of the anatomical neck of the tooth, the plane of the triangle of the gingival papilla and the volume of the proximal surface of the contact points. The line of the anatomical neck has a characteristic bending shape. From the vestibular and palatal surfaces, the volume of enamel extends significantly higher than from the medial and distal surfaces, which creates more dense contact with the volume of gum surrounding the crown. The degree of bending of the line of the anatomical neck of the tooth can take various variations, but on the medial side the bend is usually more pronounced than on the distal side. If a vertical line is drawn through the point of the apex of the bend of the line of the anatomical neck of the tooth, then in relation to the line of the cutting edge of the crown and the point of the root apex, this line will be in a more vestibular direction. In their daily practical work, in addition to clinical tasks, dentists constantly have to deal with the possibility of improving the aesthetic shape of the patient’s teeth and the problem of correct placement of teeth in the dentition. The points, edges and lines of filling the form presented for study in this section (“the coordinate system of the main anatomical landmarks”) allows dentists and dental technicians to operate with the form, deliberately change the volume in a non-standard situation, during rotation, crowding diastemas and tremata, as well as determine the correct construction of the form at the time of retrusion and protrusion of teeth. Knowledge of the deep-spatial system for constructing interlocking lines of form filling helps to change the proportional relationships of the teeth in the dentition without violating their basic structure of construction. For example, identically given proportions of the central incisors (height A and width B) can change their external perception by changing the content of just three main landmarks: the mesial and distal edges, the equatorial point of the vestibular surface and the mesial-distal inclination and the direction of the mesial and distal angle crowns
In one of the main types of fine art, sculpture, there are two ways to recreate a form. The first is modeling (alternate collection of material in small portions until the volume is completely completed), the second is sculpting (cutting off excess volumes of material to the original form). The method of step-by-step construction involves recreating the volume of the tooth using sculpting, since any excess of accumulated material leads to the wrong way of doing the work, to overkill, and subsequently to grinding off the excessively accumulated material with a bur. Initially, incorrectly collected material interferes with the integral perception of the tooth shape and the analysis of the correct construction of the volume. Therefore, the reconstruction of the tooth crown should be built in small portions along anatomical points and lines of filling the form, taking into account knowledge of the principles of bionic construction.
If we try to break down the structure of the construction of the central incisor into supposed stages, then we can propose the following method for restoring the central incisor
STEPS OF CONSTRUCTION OF THE VESTIBULAR SURFACE OF THE CENTRAL INCISER (VINEER).
Recreating the shape of the vestibular surface of the central incisor using a step-by-step construction method can be carried out in four stages: 1-formation of the volume at the point of the equator line of the vestibular surface. 2- construction of the medial and distal edges; 3- reconstruction of the vestibular plane. 4 - formation of vestibular volume. This construction is typical for wax modeling when creating diagnostic models and temporary structures
FIRST STAGE. (formation of volume at the point of the equator line of the vestibular surface.).
Using the guide lines, the line of the axis of the root of the tooth being restored, and the line of the secondary inclination of the dentition, we determine the point of the equator line of the vestibular surface of the incisor. At the intended point, on the surface of the tooth crown, we collect the first portion of material. We distribute the collected material from the base of the crown (the line of the anatomical neck of the tooth) to the points of the fracture line of the lateral edges of the vestibular surface, dividing the volume of material into two planes, forming in the area of the point the equator line of the crown, guide lines for the medial and distal edges. (Fig. 8).
The volume of collected material must correspond to the main guidelines:
1) - Points of the equator line of the vestibular surface. 2) - The central line of the root of the tooth being restored. 3) - a given angle b forming the mesial-distal filling of the crown
/explanation/.
a) If we consider the shape of the crown of the central incisor from the cutting edge, we can see that the mesial-distal filling of the crown is formed from three different volumes (lobes) in terms of filling (Fig. 9.) The mesial lobe A has a larger volume than the distal lobe C Therefore, the recruitment of the initial portion of material of the vestibular surface (at the point of the equator line) should be made taking into account the mesial-distal filling of the crown. The line at its intersection with straight AB creates an angle b that determines the medial-distal filling
b) Simultaneously with the point of the equator line, the point of “secondary crown inclination” is formed.
If we analyze the construction of the shape of the tooth crown from the approximal surface, we can see that the point of the equator line of the vestibular surface is at the intersection of two lines. The central line of the root and the line passing through the cervical plane of the tooth crown. The angle of intersection of the two lines should be approximately 30 degrees. The intersection of the central line of the root with the plane of the lower third of the crown approximately corresponds to an angle of 10 degrees. The vestibular surface constructed in this way determines
the correct functional load of the crown, makes it possible to hit a food bolus at the point of primary and secondary inclination of the crown. The formed angle prevents injury to the gums, helping to provide additional massaging. (Fig.10).
The construction of the vestibular surface in this way is characteristic not only of the anterior group of teeth, the lines of primary and secondary inclination of the crown are clearly expressed on the vestibular surface of almost all teeth of the lateral incisors, canines, premolars and molars.
SECOND STAGE (Construction of the medial and distal edges)
After determining the point of the equator line, we determine the direction of the medial and distal edges of the crown. We apply longitudinal portions of the material to the vestibular surface, determining the main portions of the crown volume (Fig. 11).
Using a spatula, we form two planes in each of the lateral volumes, forming guides for the medial and distal edges. The central lobe is slightly flattened. The main landmarks for the lateral volumes at this stage are the medial and distal edges of the adjacent central and lateral incisors (teeth 12 and 21). For the central lobe, the guideline is the filling of the vestibular surface of the adjacent central incisor.
THIRD STAGE (recreation of the vestibular surface)
After determining the three main guide volumes of the vestibular surface of the central incisor, we produce an additional set of material, filling the central part of the crown in small portions. Using a small amount of material, we collect the lateral edges of the vestibular surface of the central incisor.
The main guidelines for the correct selection of material at this stage are the medial and distal edges of adjacent teeth and the vestibular surface of the adjacent incisor.
On the lower part of the vestibular surface of the crown, two small portions of material are collected, giving a smooth transition to the cutting edge. A thin layer of material is collected at the base of the cutting edge to complete the formation of the cutting edge of the crown (Fig. 13)
At this stage, the general process of forming the vestibular surface of the incisor using the method of step-by-step material collection has been completed. The next stage in the formation of the vestibular surface is processing, which is necessary to give the crown an additional anatomical shape and remove, if necessary, excess material.
FOURTH STAGE (formation of the vestibular volume of the crown)
The final formation of the vestibular surface of the central incisor occurs at the last fifth stage during the formation of refraction lines of the lateral edges and longitudinal hollows during processing and polishing of the veneer. Processing must be done very restrainedly, constantly paying attention to control landmarks, anatomical points and lines of filling the shape of adjacent teeth.
After correcting the basic shape, during processing it is necessary to pay attention to the formation of fracture lines of the medial and distal edges that form the volume in the upper third of the crown (Fig. 15). With enough experience, this feature can be easily formed during “sculpting”... On the central incisor this volume will not be expressed as significantly as on the canine or premolar, but recreating this volume is very important, especially from the distal edge. The shape of the vestibular volume gives the tooth a finished appearance and forms a deep-spatial connection between the vestibular surface and the palatine surface. After the final stage of recreating the vestibular surface of the central incisor, a shape is formed that corresponds to the main anatomical points and filling lines.
STEPS OF CONSTRUCTION OF THE PALATAL SURFACE OF THE CENTRAL INCISOR.
The construction of the palatal surface of the central incisor can be carried out in five stages:
1-formation of volume at the point of the equator line; 2 - construction of the medial and distal edges. 3-filling of the central plane. 4-recreation of serrated volumes
FIRST STAGE. (Formation of volume at the point of the equator line.).
On the palatal surface of the dentition we find the guide of the points of the equator line. We determine the central line of the root of the tooth being restored. At the intersection of the line, we select a point on the equator line of the palatal surface and form the first portion of the material.
From the collected material we recreate the volume of the palatal tubercle of the crown. From the point of the equator line of the palatal surface of the crown, we divide the accumulated volume into additional planes, forming guide lines for the lateral edges of the palatal surface of the incisor. The general boundary of the material collection should be in the area of three points. Two points located on the fracture line of the lateral edges and the point of the anatomical neck of the tooth crown (Fig. 17).
The main landmarks at this stage are the points of the equator line of the palatal surface of the dentition, the volume of the palatal tubercle of the adjacent incisor.
SECOND PHASE. (Construction of the medial and distal edges).
From the points of the fracture lines of the lateral edges to the line of the cutting edge of the crown, we collect two longitudinal lateral volumes. (lateral ridges) From the formed lateral volumes we form the medial and distal edge of the palatal surface of the central incisor. (Fig. 18)
THIRD STAGE (filling the palatal plane)
Using a small amount of material between the volumes of the medial and distal edges to the line of the incisal edge of the crown, we gain the volume of the palatal plane
When recreating the palatal surface at this stage, it is necessary to pay attention to the formation of the cutting edge of the crown, which is visible on the palatal surface of the central incisor.
FOURTH STAGE (formation of two tooth-shaped ridges of the palatal surface)
Along the fracture line of the lateral edges on the palatal surface of the central incisor, we collect two volumes. From the collected volumes we form two tooth-shaped edges of the palatal surface (Fig. 19). These volumes are not always clearly expressed and have individual characteristics.
At this stage, the construction of the palatal surface can be considered complete; final processing should be carried out without disturbing the formed anatomical shape. Recreation of the palatal surface is as important as the vestibular one, since errors in its formation lead to a number of undesirable consequences and dysfunction when the incisal path of maintaining the upper and lower dentition is disrupted.
GENERAL STRUCTURE OF THE CENTRAL INCISER CONSTRUCTION.
This section considers the reconstruction of the shape of the central incisor as a single overall volume, simultaneously with the vestibular, palatal and proximal surfaces. This construction technique gives a general idea of the shape of the tooth in the dentition and its correct position at the time of occlusion. The method can be used not only by dental technicians but also by dentists to teach the step-by-step construction of a tooth shape from modeling wax and a light-curing composite. The construction of the central incisor can be carried out in eight stages.
FIRST STAGE (recreation of the volume of the tooth stump)
The construction of the crown of the central incisor should proceed from a pre-formed “initial” volume. If the volume of the stump is formed for further restoration of the tooth crown from multilayer plastic or light-curing composite on the surface of the tooth stump, it is necessary to build a volume of mamelons from dentin, which will give the volume of the tooth crown an internal color fullness. (Fig. 20) To build a tooth crown from modeling wax, recreating the internal volume of mamelons is not required. The main guideline for correctly constructing the volume of a tooth stump is the anatomical shape of adjacent teeth.
SECOND STAGE (determination of points of the equator line on the vestibular and palatal surface).
To place a tooth crown in the dentition, it is necessary to correctly determine the points of the equator line on the vestibular and palatal surface. On the vestibular surface, the point of the equator line is located at the intersection of the line of the central axis of the root and the guide passing through the points of the equator line of adjacent teeth. On the palatal surface, the point of the equator line is located at the intersection of the central line of root filling and the main guideline of the points of the equator line; at the designated points on the vestibular and palatal surface we collect the first two portions of material. The collected volumes are divided into two additional planes, forming the guide lines of the lateral edges of the palatal tubercle and the vestibular volume.
The main guidelines at this stage will be: 1) Guide points of the equator line of the vestibular and palatal surfaces. 2) Line of the cutting edge of the dentition 3) Angle forming the medial-distal filling of the vestibular surface. (Figure 21.)
THIRD STAGE. (Formation of the lateral surfaces of the crown).
From two apraximal surfaces (from the neck of the tooth stump to the line of the cutting edge of the crown) we collect two lateral volumes. Using a small tool from the collected material, from a point along the line of the anatomical neck of the tooth and from a point towards the line of the cutting edge, we form the lateral planes of the triangle of the gingival papilla and the surface of the apraximal contact points.
On the side of the line of the cutting edge of the crown, at this stage of construction, four approximate points are formed (two points of the equator line on the vestibular and palatal surfaces and two points of contact points of the apraximal surfaces), which determine the main landmarks in the direction of placement of the tooth crown in the dentition.
From the contact points along the line of the cutting edge of the dentition, we collect the next portion of material and form the line of the cutting edge of the crown. Using collected portions, we recreate the future contour of the vestibular surface of the central incisor from the vestibular surface (Fig. 22).
Main landmarks: 1) Two proximal points of the medial surface of adjacent incisors. 2) Contour of the vestibular surface of the adjacent central incisor. 3) Line of the incisal edge of the dentition
FOURTH STAGE (Construction of the medial and distal edges of the vestibular surface.)
From the point of the equator line to the cutting edge of the crown, we define two lines of the medial and distal edges of the central incisor. Along the designated lateral lines and the central line of the vestibular surface, we collect three longitudinal volumes of material. (Three beats). We divide two lateral volumes into planes, forming medial and distal edges. (fig23)
Along the medial and distal edges, at the point of the equator line, we line up the lateral plane of the vestibular surface.
FIFTH STAGE. (Formation of volume at the point of the equator line of the palatal surface.) /volume of the palatal tubercle/.
From the points of the line of the anatomical neck of the palatal surface to the points of the fracture line of the lateral edges, we collect a portion of material. We form the volume of the palatal tubercle. (Fig. 24.)
The reference point at this stage will be the volume of the palatal cusp adjacent to the central incisor.
SIXTH STAGE (Formation of the medial and distal edges of the palatal surface)
From the points of the fracture line of the side edges to the line of the cutting edge of the crown, we assemble two side bolsters. Using a smoother, we divide the collected volume of material into two planes and form the medial and distal edges of the palatal surface. (Fig. 25.)
SEVENTH STAGE. (Construction of the lateral ridges of the palatal surface.)
From the fracture line of the lateral edges to the points, we use two portions of material to form the volumes of the two lateral ridges and the edges of the palatal surface (Fig. 28).
The reference point for construction at this stage will be the anatomical shape of the palatal surface of the adjacent incisor.
At this stage, recreating the shape of the central incisor using the step-by-step construction method can be completed (the “sculpting” stage). For the final formation of the tooth volume, additional processing and polishing is required, completing the ninth stage. ("sculpting" stage
EIGHTH STAGE. (Formation of fracture lines of the lateral edges of the vestibular and palatal surfaces.)
During the final processing of the tooth shape, in addition to eliminating possible excess material, attention should be paid to the formation of fracture lines in the shape of the lateral edges of the vestibular and palatal surfaces. From the palatal surface, these lines form the volume of the palatal tubercle (Fig. 29); from the vestibular surface, the form of “vestibular volume” is formed (Fig. 30). The formation of these lines is typical for any group of teeth. On the vestibular surface, the formation of fracture lines of the lateral edges is more pronounced on the premolar canines and demarcations. In incisors, this shaping is also present, but it is more pronounced on the distal side. When processing the shape of the crown of the central incisor, it is necessary to pay attention to the structure of these volumes.
The proposed method for constructing the crown of the central incisor gives a general idea of the anatomical shape of the tooth. After acquiring certain theoretical knowledge, practical experience, and the ability to determine the main landmarks for the correct placement of teeth in the dentition, the number and stages of operations at the time of constructing the shape of the tooth can be individually changed.
Fangs made from artificial nails
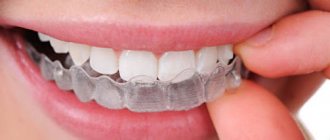
How to easily make vampire teeth or fangs from artificial nails with your own hands? To grow such fangs at home, you will need to purchase a set of artificial nails from a cosmetic store. It is preferable to choose beige or milky nails. Depending on the size of your own teeth, you need to select two nails from the set. Using scissors and a nail file, give them a cone-shaped, pointed shape. Next, try it on in front of a mirror and adjust the length if necessary. It is better to trim and file the nail over a spread newspaper, so as not to litter the room. Nail glue should be used with caution, as in large quantities it can damage the enamel. It is best to use dental or base wax for fastening.
As a replacement for nails, you can cut plastic pads from scrap material. A white jar of vitamins or a plastic cup are perfect for growing fangs at home, like a real vampire. To do this, you need to cut out two pads from plastic and attach them using one of the above methods.
Necessary materials:
- A set of artificial nails (white plastic as a replacement);
- Scissors;
- Nail file;
- Dental wax or nail glue.
Modeling a tooth from plasticine
How much time, nerves and effort parents spend trying to persuade their child to go to the dentist. But this procedure is extremely necessary, because all adults know about the consequences that can arise if caries is not noticed in time. But how can we explain this to children? All kids are terrified of doctors, and even more so of dentists.
We invite you to experiment and turn futile persuasion into an exciting game. Make your teeth out of plasticine. On the one hand, you will have fun and useful time with your children, on the other hand, you will tell them important information and prove that going to the dentist is extremely necessary. In this sculpting lesson we will show you how to sculpt teeth from plasticine. Let's give them a funny cartoon look. One of our teeth will be healthy - with a smile, the other - sad and sick with caries. So, let's start our experiment.
To sculpt teeth from plasticine you will need:
- white plasticine - first of all;
- grey, blue and black - little crumbs of additional shades;
- stack - a sharp plastic instrument.
1. Naturally, the teeth should be white, so only this color is suitable for work, unless, of course, you are going to depict gold or silver crowns.
2. Let's make two teeth, so you should divide the block in half and roll two balls.
3. Pull the beads into standard drops.
4. Cut the sharper part of each volumetric workpiece to show the tooth root.
5. Make the wider part flat and similar to the surface of the tooth using your fingertips.
6. Leave one tooth – a healthy one – unchanged, the second one – stripe the top with a glass and attach a small gray spot.
7. So, our first tooth is healthy and happy. Attach the eyes and make a stacked smile.
8. The second tooth has caries and is sad. Attach the eyes and make a stack of sad expressions on the face.
This is what a dental fantasy turned out to be. Now is the time to come up with a fascinating tale about two white brothers, one of whom was terribly afraid of dentists. Most likely, the child will immediately understand which tooth we are talking about.
If you find an error, please select a piece of text and press Ctrl+Enter.
Olesya Selikhova
About the author: Psychologist, specialist in the field of family relationships and raising children. I love drawing, modeling, needlework and any interesting creativity. Mom raising two children and a wonderful wife!
items
Share with friends:
We also recommend watching!
How to make a house from plasticine.
How to make a vase from plasticine.
How to make a duck from plasticine.
Modeling a brown dog from plasticine
Modeling a monkey from plasticine
How to make a hedgehog from plasticine.
How to make a hare from plasticine
How to make a kitten from plasticine.
How to make an elephant from plasticine
How to make a fox from plasticine
How to make a T-34 tank from plasticine
How to make a panther from plasticine
Fangs made of cotton wool
How to make fangs from cotton swabs or swabs with your own hands in a couple of minutes, at home? Growing fangs from cotton wool will not take much time and effort. It is necessary to form two cotton cones, elongated in shape, and carefully attach them to the teeth.
Just like paper, cotton wool is highly susceptible to deformation, so it is not suitable for long-term use as vampire teeth.
Necessary materials:
- Cotton swab or cotton swab;
- Scissors;
- Dental wax or glue.
Fangs made of clay or plasticine
How to make fangs from polymer clay or hardening plasticine with your own hands? If you build up teeth sculpted from plasticine or clay, even those made at home
they will look no worse than store-bought ones. Environmentally friendly plasticine can be purchased in any children's goods department. Unlike clay, it hardens on its own within twenty minutes and does not require heating in an oven.
White plasticine should be mixed with a small amount of yellow to obtain a more natural color. From the resulting mass, you need to sculpt two fangs of an elongated, flattened shape, approximately twice as long as your own. It is better to attach it with dental wax or nail glue.
Necessary materials:
- Clay or plasticine;
- Modeling kit;
- Dental wax or glue.
It is important to remember that with any method of growing teeth like a vampire at home, you should follow simple hygiene rules. And also do not forget that fangs are teeth number three, if you count from the center.